Table of Content
Moreover, you can contact your hairstylist by phone, order a custom hair color kit online , and even get direct instructions from a pro via Zoom. Once you’ve achieved a shade light enough to be a blank canvas for the hair dye, wash and shampoo the bleach out. We suggest using TRESemmé Botanique Color Vibrance & Shine Shampoo and Conditioner.
If you’re wearing any kind of jewelry such as ring, necklace, and bangle then remove it before doing this complete process. Apply conditioner to any portion of dry hair where you want to preserve the existing color or ends. Make sure you're comfortable , have everything you need (we've got you there below), and aren't pressed for time. Now, get into the best insider at-home hair-color tricks and tips for achieving salon-worthy results. Now I feel completely prepared and no longer worried that her hair will be screwed up. It was much more informative than the directions that came with the hair dye."
Step 5: Wrap the Hair in Foil, Let the Dye Set, and Wait
Check the color periodically to see if it is bright enough. With many colored dyes, the longer you let it sit, the brighter it will be. Just make sure to check the packaging for directions for your specific product. Remember, some dyes will fade gradually with washes, so if you don’t let it sit very long, you will get a paler color that washes out faster.

Put some type of product in their hair, such as a heat protectant, hair mousse, or a smoothing serum. This will protect their hair from any damage from the heat of the blow dryer. Mix together the bleach according to the package directions and apply to the ends of the hair. Use aluminum foil underneath the hair to keep things clean and protected. Try to cover all the hair evenly with the bleach and do not go above the rubber band. Remember, whatever hair the bleach does not touch will not lift.
Don't trust the model on the box of hair dye
Be generous with the dye — your hair should be as saturated as possible to ensure even, all-over coverage. Clip the strands you colored out of the way. For the back, you can take slightly larger sections since you’ll be over-saturating. Leaving both front sections hanging free, begin to create sections down your part that are about a quarter-inch thick . Along your part, color at the root, spread the hair dye with your thumb, and then fold that section of hair to the other side.
When possible, avoid using blow dryers, flat irons, and curling irons. If you do use them, make sure to use a heat protectant. Have fun styling your new dyed hair, experimenting with fun new styles to show it off. Roughly 43 million women in the U.S. have dyed their hair in the past six months, according to research from Nexxus. Purchasing the right at-home hair dye kit can make coloring your hair at home a much easier process.
Choosing Your Products
Clip those sections out of the way and repeat on the other side. When you’re finished, your hair should be divided into four even sections. Follow this step-by-step guide and you’ll be a pro in no time. It is a natural, herbal conditioner, and it promotes growth. Use dry shampoo in place of liquid shampoo to help maintain color even more. Remember to remove any jewelry you don’t want to get dye on, like earrings or rings.
Now it’s time to actually dye your hair. Be sure to follow the instructions on the hair color kit to avoid any mistakes. Colored hair dyes sit on top of your natural hair color. For example, if you apply a pastel pink hair dye to very light blonde hair, it will show up pastel pink.
However, when you buy something through our retail links, we may earn an affiliate commission. To revisit this article, visit My Profile, thenView saved stories. The easiest way to add a punch of color without going overboard. She is based in the Chicago suburbs and is a mom to two little boys and rambunctious rescue pup.

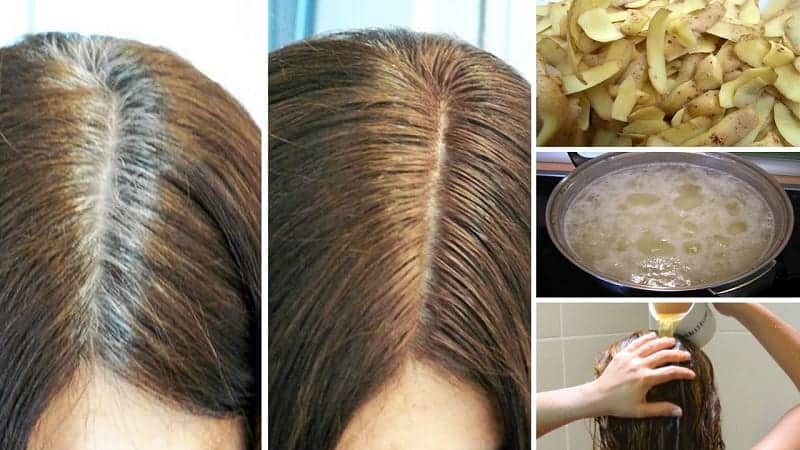
You’ll love this ultra-nourishing mask. Then, rinse, dry and style your hair as you usually would. You’ve just learnt how to dye your hair at home. You can use a brush to paint it on the section, or you can “dip” it into a bowl filled with the dye, spreading it along the section of hair with your gloved hand. Concentrate the majority of the dye on the ends of your hair, making sure the tips are fully saturated.
Release all your hair to give your hair a quick massage. Gently massage your scalp to generate heat. Quickly run your fingers through your hair from root to tip to make sure the dye is distributed evenly throughout each section. Then gather your hair up and clip it. Certain areas, like the back of your head, can be tricky to do on your own.
You want the color to be even around your entire head. Purchase a bleaching or lightening product. If you have dark hair and want to achieve light-colored tips, this is a necessary step. You will need to bleach the dark color from your hair so the colored dye will take later in the process. Follow the instructions and leave the hair dye on for the allotted amount of time. We recommend setting a timer on your phone so you don’t forget.
Make sure to get your hair evenly separated into two horizontal sections. The rule of thumb is to part the hair along the line connecting the tops of your ears, but you can adjust the scheme as you want, even by making a semicircle. Protect the skin on the neck by applying petroleum jelly and then paint the lower section starting from the roots. Ombre coloring is similar to the previous technique but with a smoother transition. To succeed with ombre, it is recommended to slightly backcomb your locks in the area where you want the fade to start. You can also divide your hair into the top and bottom sections and color the upper section more intensively for a softer contrast.

To help, we've compiled advice from our favorite hair pros about every DIY hair decision, from allover color to subtle highlights. If you can’t choose one color, go for two! Go for both but create a two-toned, color-blocking technique to let both colors stand out on their own.


No comments:
Post a Comment